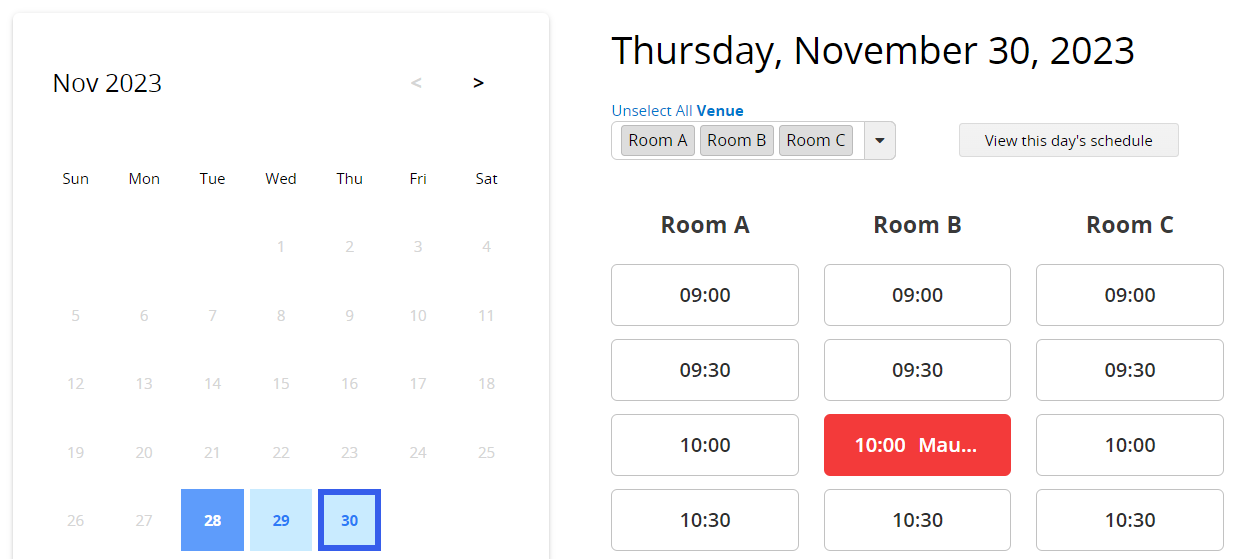
If your organization currently uses paper, calendar, or Google forms to manage meeting room reservations, you may have come across issues such as double-booking, or simply been frustrated by the scattered information, making it difficult to quickly determine meeting room availability. Ragic’s Meeting Room Manager template includes a simple-to-use Reservation System report that you can install with one click. Once that’s done, everyone can use a simple interface like the one shown below to reserve meeting rooms without worrying about double booking. You can also easily check and manage booking records.
This template can also be used for various “venue reservation” scenarios. If what you need is a “custom reservation system”, such as equipment loans, or personal consultation appointments, you can also make use of this online booking system. Simply install the Meeting Room Manager template then modify a few fields to have it suit your use. You can find instructions on how to do this in the Advanced Settings section down below.
If you are already a registered user of Ragic, just go to the Install Template page and click on the Administration category.
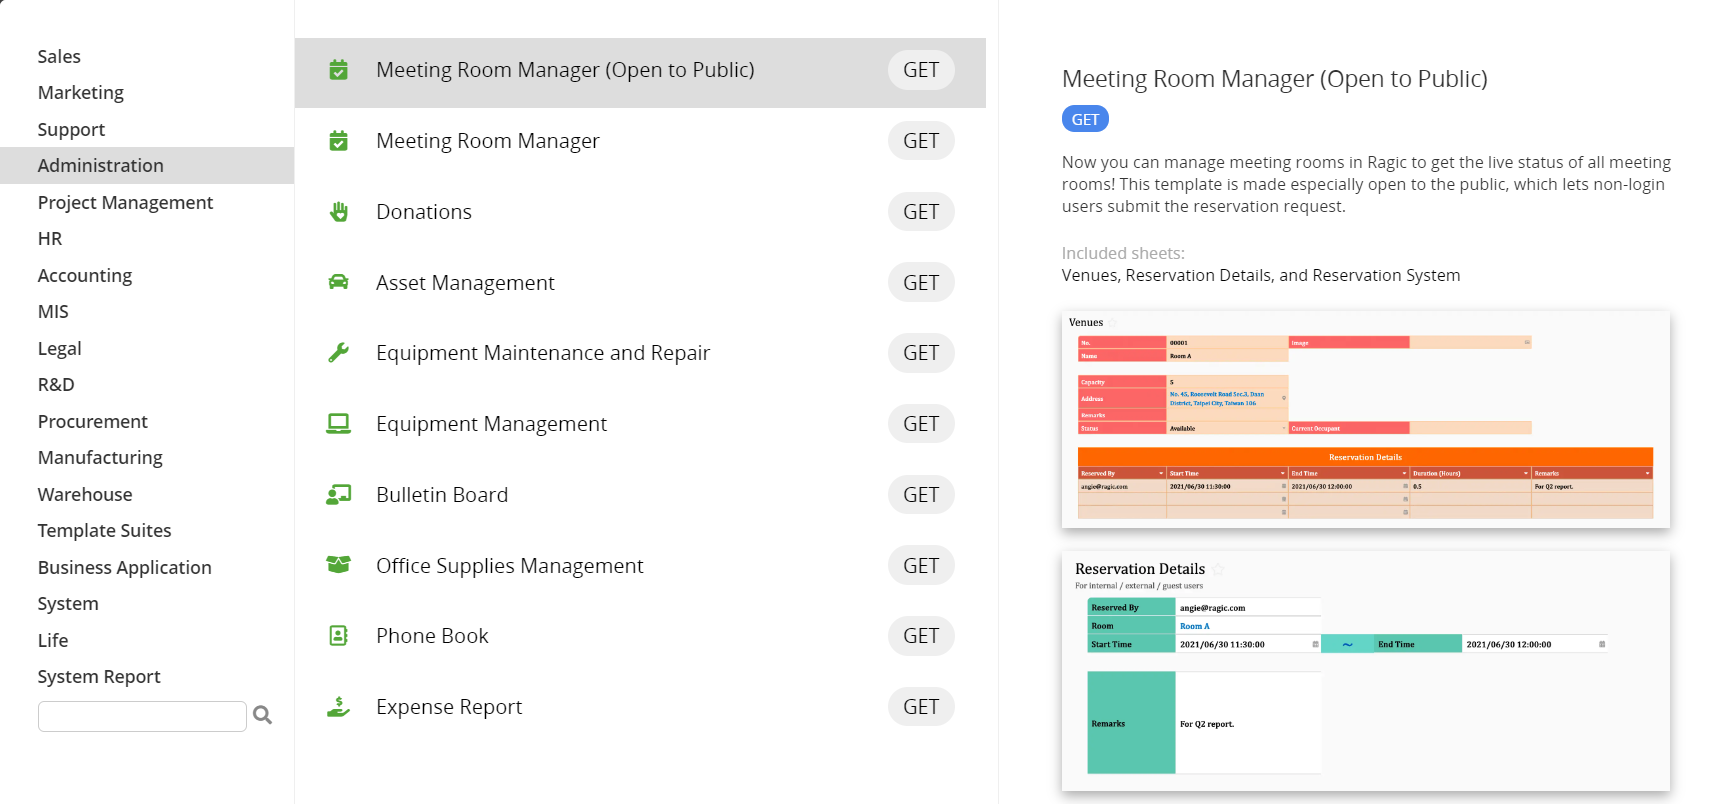
You’ll find the following two templates:
1. Meeting Room Manager
2. Meeting Room Manager (Open to Public)
The two templates have the same basic functionality and differ only in access rights.
"Meeting Room Manager" is mainly for internal use. It is accessible by Ragic users only, so you need to add everyone who needs to use this system as users (internal or external) in your database. They need to Log into Ragic to use the booking system. The benefit of this is that access rights are more strictly controlled so you know only a particular group of people would be using it.
"Meeting Room Manager (Open to Public)" is for everyone who has not been added to the system as a user. This is useful for scenarios such as managing business meeting rooms or venue rentals. Anyone with the URL to the booking system can see the booking page and make their own reservation without logging in, making it extremely convenient when the system needs to be open and available to be used by more people.
You can click "GET" to install one of the templates above depending on your needs. If you don’t have a Ragic account yet, use the following link to register and directly install the module (Don't worry, Ragic won't charge you anything without your permission):
2. Meeting Room Manager (Open to Public)
The two templates are described separately below:
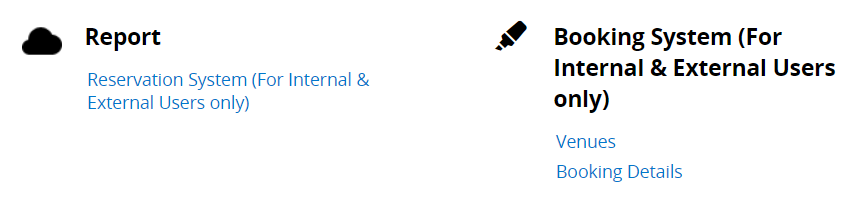
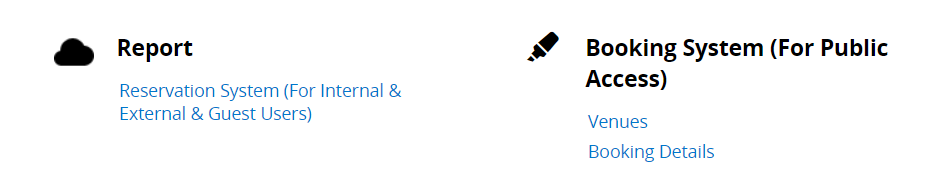
After installation, you’ll see two new sheets on the database home page: Venue and Booking Details under the tab “Booking System (For Internal and External Users only)”. In addition, you’ll also see a “Reservation System” report under the Report tab:
1. Go to the Venues sheet, and add information about the venue (e.g. meeting room) you wish to put up for booking.
2. Go to the “Reservation System” report page, then configure the settings (such as time slots) and save it.
3. Add everyone who needs to use the system from inside the organization as users and those from outside the organization as external users and you’re ready to go. (If the external user feature has never been used, you need to enable it first)
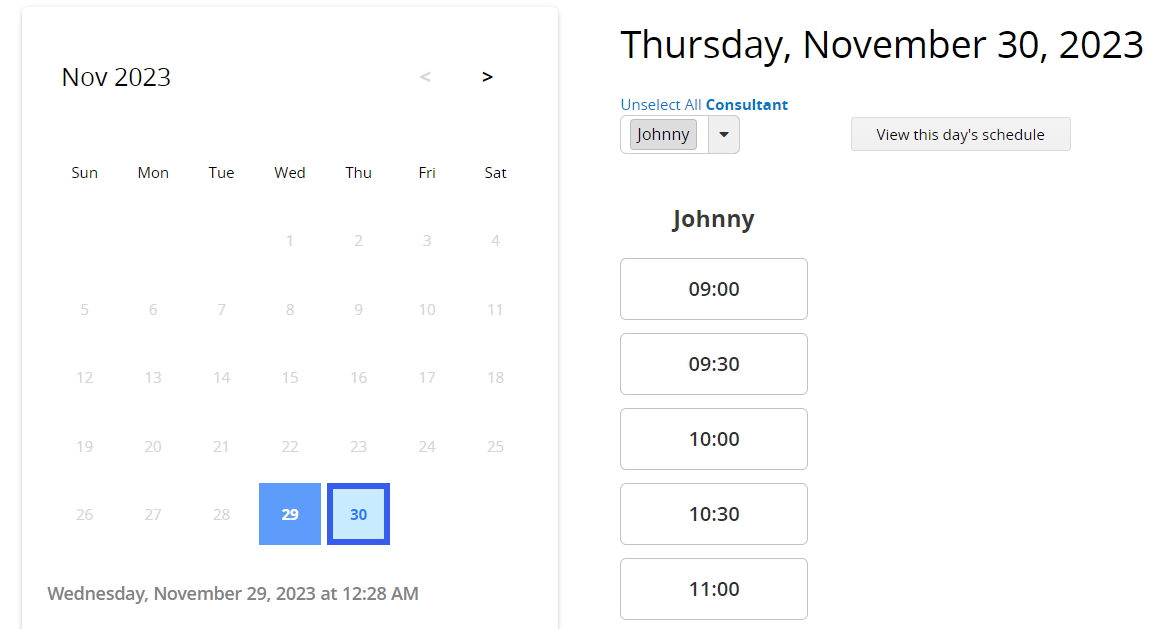
4. Copy the URL of the “Reservation System” report page straight from the address bar of the browser and send it to your users. Once they click on the URL and log into Ragic from the top right corner of the page, they’ll be able to select the meeting room and time slot to make a reservation. They’ll also be able to see which venues have been booked and make changes to reservations they themselves have made.
Follow the steps above to use the template. For more detailed instructions, keep on reading:
In this sheet, you can add and manage venues (meeting rooms) available for booking within the organization. Three sample entries are included with the system so you can get your feet wet quickly: Meeting Rooms A, B, and C. Here, you can add information about the venue you want to make available for booking. We recommend you look through the entire template before you manually remove the sample data.

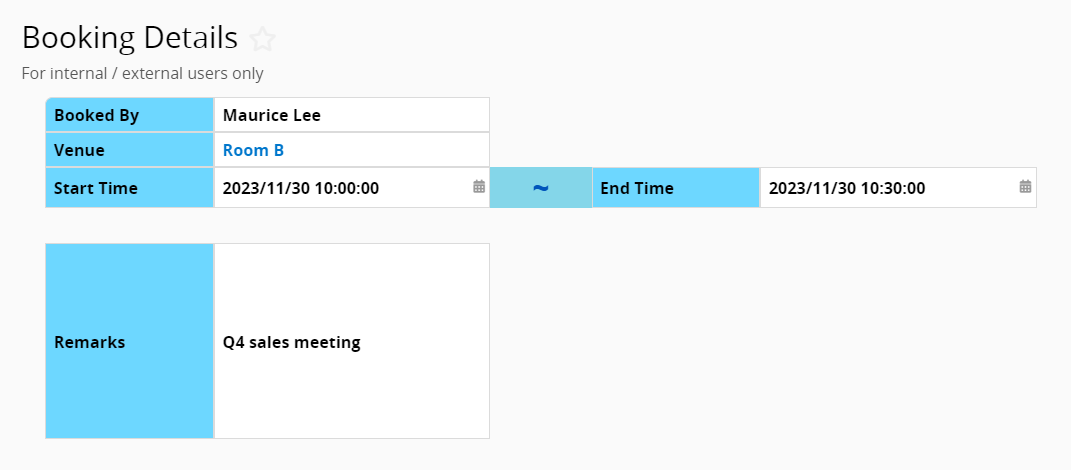
Click to access the form page of each venue. You’ll see a subtable section that automatically shows all past bookings for the venue. This is created using Ragic’s function to show references from existing sheets. All booking records for this venue in the “Booking Details” sheet will automatically be displayed here and set to read-only by default. Don’t modify this unless you have to.
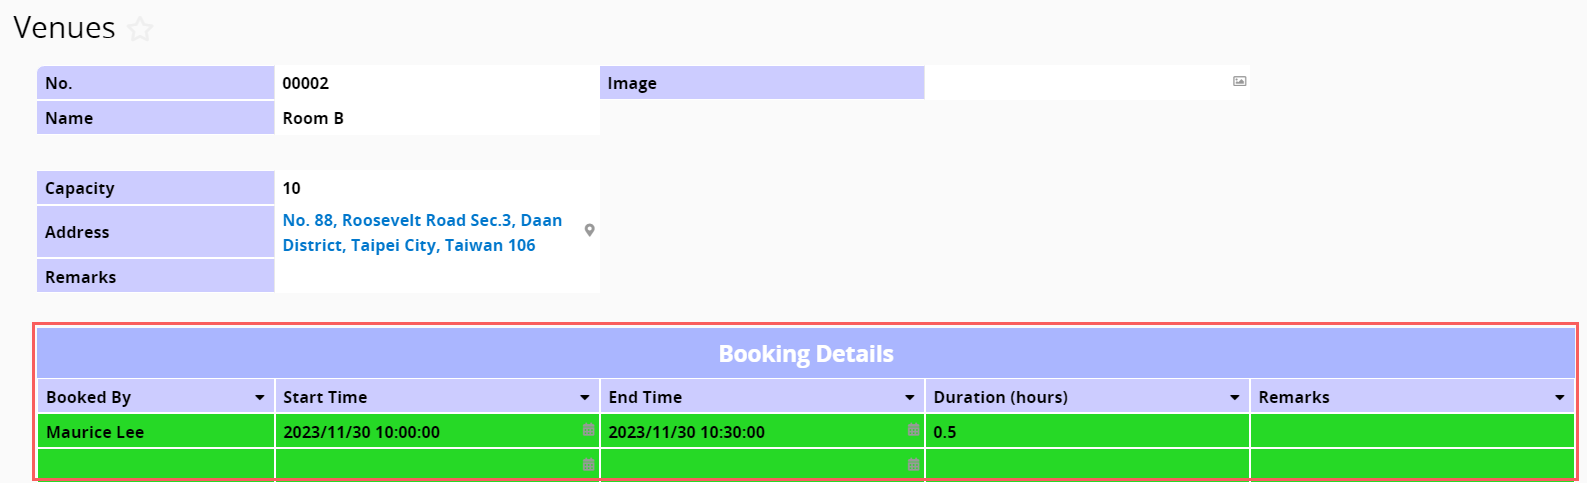
This is a sheet that is linked to the Reservation System report. All reservations made in the reservation system report page will be turned into an entry for this sheet. Here, all previous reservations can be viewed at a glance as a list. Please note that creating new entries in this sheet is not recommended (all fields in this sheet are configured as read-only).
This is a report designed based on the fields in the Booking Details sheet. Fields such as Item in the top half of the page have already been set up properly. You just have to configure the fields in the red box below, which includes settings such as available times. Once it’s set up, click “Create Report” to update the settings. For details about the settings, refer to this tutorial.
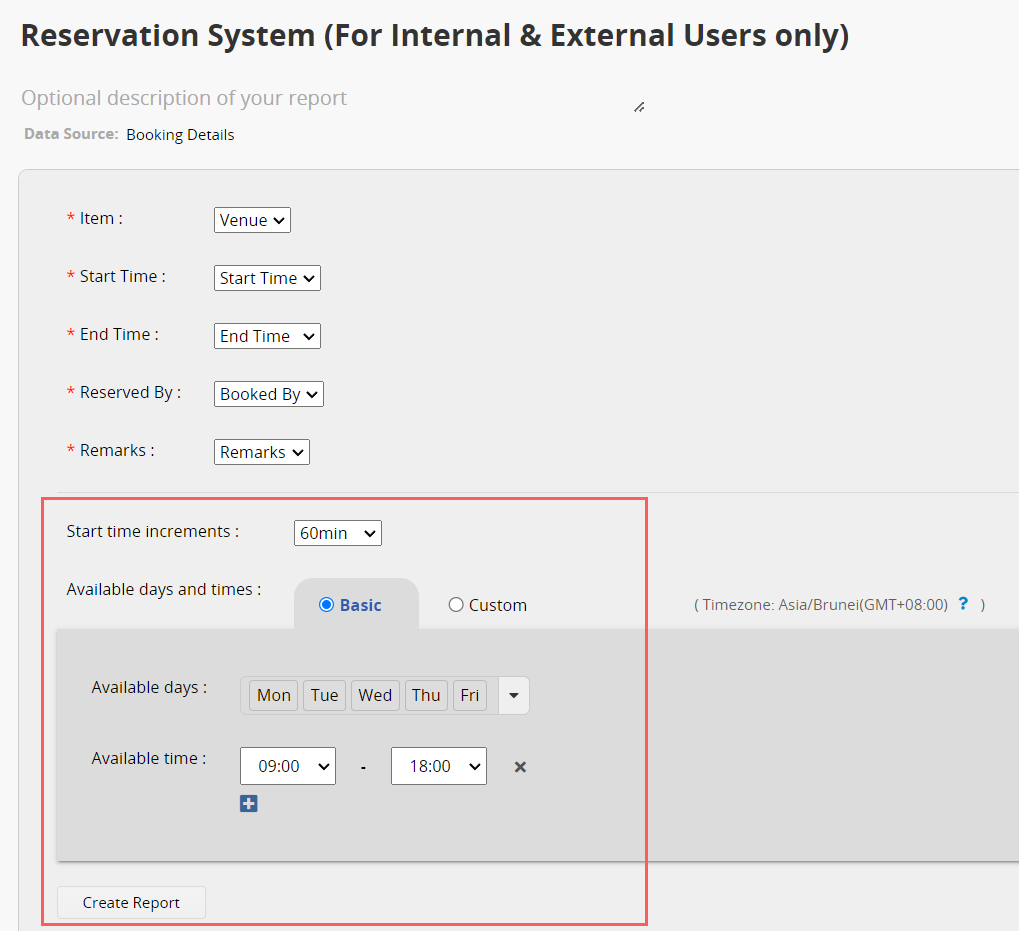
Your users (any user other than the administrator, SYSAdmin) will not see the configuration information above. They will only see the reservation interface below the “Create Report” button. If you need more information on how to use the report, you can offer this article to the user for reference.
The default access rights for different types of users are shown below.
| Sheet / Report | Internal User Rights | External User Rights |
| Reservation Report (For Internal & External Users only) | Bulletin User (sees all reservation details, but can only edit those created by themselves) | Survey User (sees only their own reservation details. For reservations made by others, they can only see that the item is unavailable without access to the details) |
| Booking Details | Bulletin User (sees all data) | Survey User (sees only their own reservations) |
| Venues | Bulletin User (sees all data, but can only edit those created by themselves) | No Access (cannot view this sheet) |
After installation, you’ll see two new sheets on the database home page: “Venue” and “Booking Details” under the tab “Booking System (For Public Access). In addition, you’ll also see a Reservation System sheet under the Report tab:
1. The system administrator goes to the Venues sheet and adds information about the venue (meeting room) that is to be put up for booking.
2. Go to the Reservation System report page and configure the settings (such as time slots), and save the settings.
3. To give internal users more access rights, anyone who needs to use the system from inside the organization can be added as a user, while those outside the organization can be added as external users. Skip this step if the system is to be opened to the general public.
4. Make the URL of the Reservation System report public so those who need it can use this URL to select a meeting room and time slot to make a reservation.
The setting for other sheets is similar to the “internal & external users only” version. Refer to Venus, Booking Details, and Report Description if needed. Refer to the following for access rights information:
The default access rights for different types of users are shown below. In general, this is similar to the Meeting Room Manager for registered users only, except that it allows those who have not logged in (EVERYONE) to access the system with rights identical to those of an external user.
| Sheet / Report | Internal User Rights | External User Rights | Everyone (not logged in) |
| Reservation Report (For Internal & External Users only) | Bulletin User (sees all reservation details, but can only edit those created by themselves) | Survey User (sees only their own reservation details. For reservations made by others, they can only see that the item is unavailable without access to the details) | Survey User (sees only their own reservation details while making a reservation. For reservations made by others, they can only see that the item is unavailable without access to the details) |
| Booking Details | Bulletin User (sees all data) | Survey User (sees only their own reservations) | Survey User (sees information related to their own reservation only while making the reservation) |
| Venues | Bulletin User (sees all data, but can only edit those created by themselves) | No Access (cannot view this sheet) | No Access (cannot view this sheet) |
In Ragic, users may customize all the free templates (i.e. modify the design) to suit their needs. As long as the number of customized sheets within the database does not exceed 3, no additional fees will be required. For details, see this article. Take the “Meeting Room Manager” as an example, we can use the template as a starting point and make a few simple design changes to apply it to different reservation systems (e.g. equipment rental, personal consultation, nail salon, personal trainer, etc.). This is why this template is so convenient! We’ll modify “Meeting Room Manager (Open to Public)” as an example to give a few simple tips.
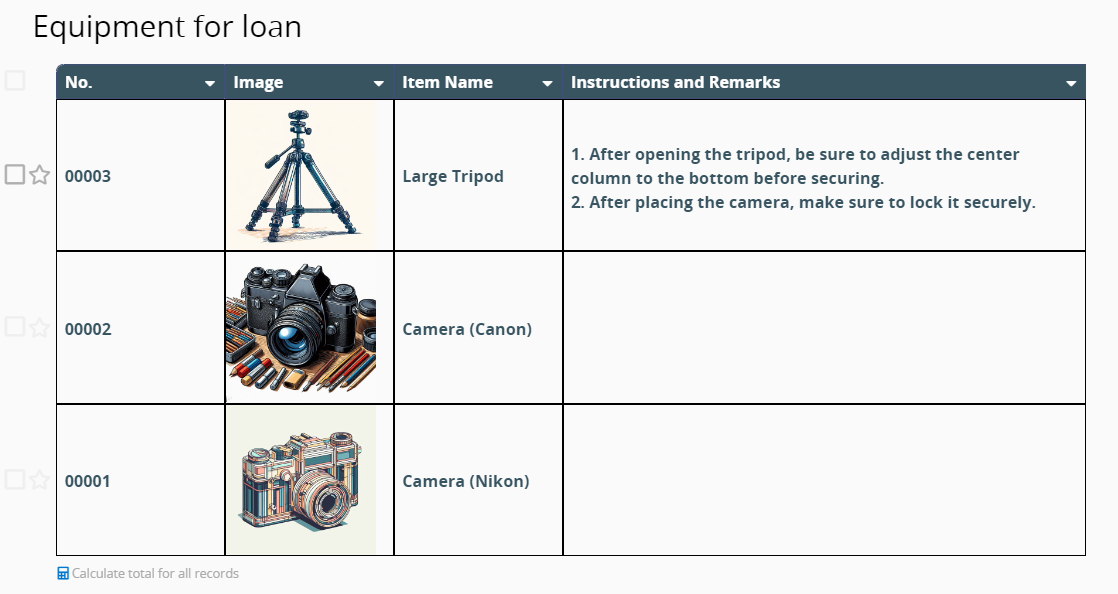
To go from a meeting room (reservation) management system to an equipment rental reservation system, the biggest difference is that the resource or item to be reserved is changed from a meeting room or venue to equipment. So, all you have to do is modify this item, and the existing template can be transformed into an equipment reservation system.
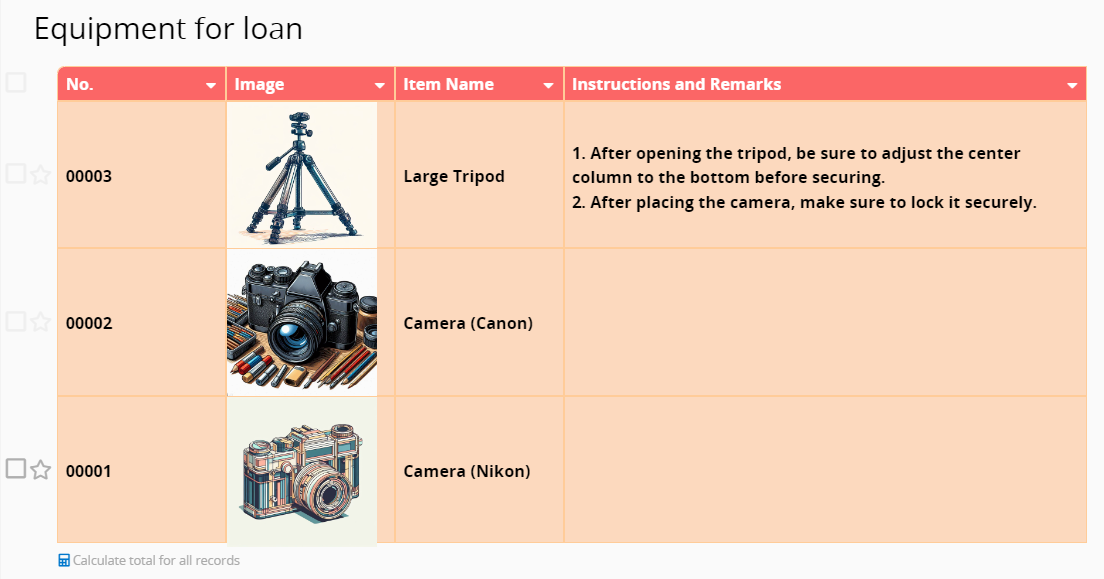
Change the Venues sheet into an “Equipment for loan” list, modify the relevant fields and sheet names to change the data entries from meeting rooms to individual equipment for loan, like this:
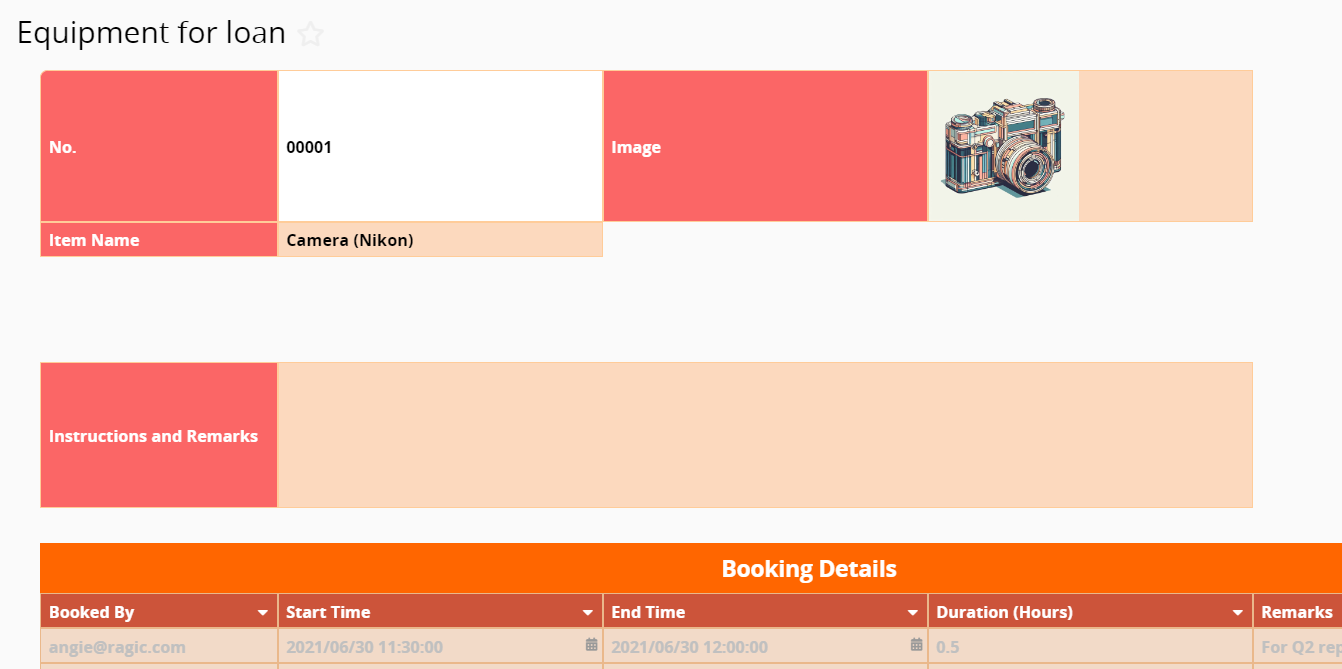
Note that every piece of equipment needs to be its own separate entry. For example, if you have 5 cameras, then you need 5 different entries so you can manage and make reservations for each one separately.
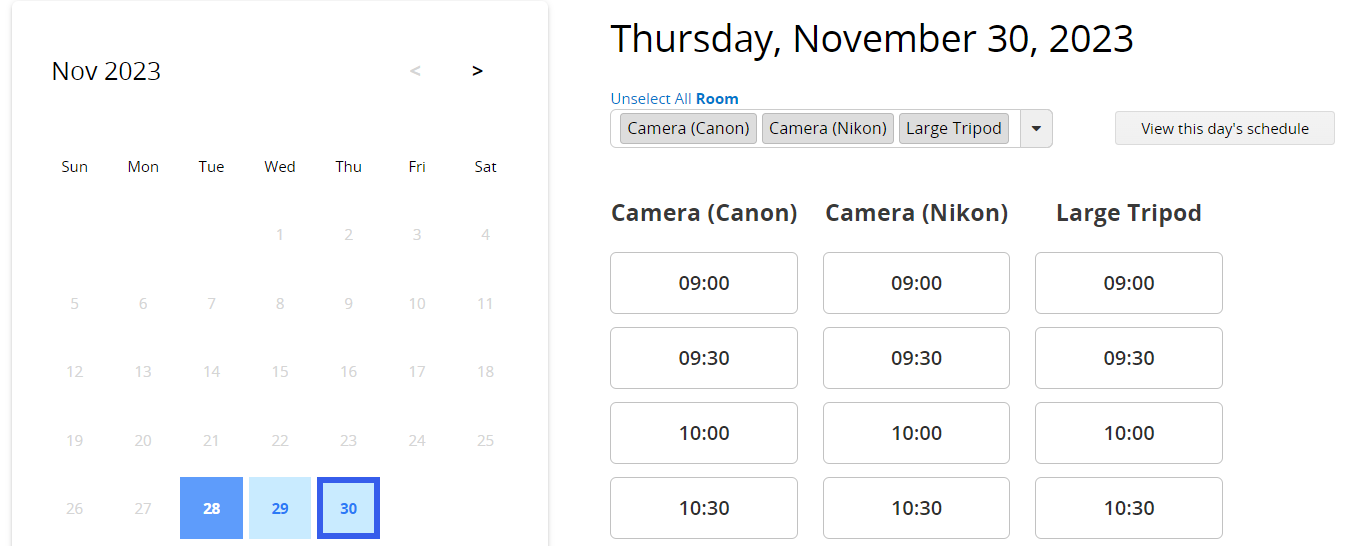
After you change the “venues list” to an “equipment list”, all you have to do is to look for the word “venue” and change it to “equipment”. In terms of the template default, that means changing “Room” in the Booking Details sheet to “Equipment”. After modifying the sheet, you won’t need to change the Reservation System report; it’ll automatically display the new options:
If there are not many pieces of equipment for loan, and there’s no need to add notes or check the loan record for each piece of equipment, the sheet can be made simpler. In this case, you won’t even need a separate sheet to list the equipment, simply turn the list of equipment into a drop-down list for the “equipment” field in the “Booking Details” sheet. In this way, you cut down the number of sheets to one, making the system easier to understand and manage.
Here’s how to do it:
1. Go to the Venues / Equipment list sheet and remove the “Booking Details” subtable.
2. Go to the “Booking Details” sheet, and use this method to unlink the Room/Equipment field from the other sheet. (The system blocks this action if the previous step was not performed as a failsafe, so the “Booking Details” subtable needs to be removed first.)
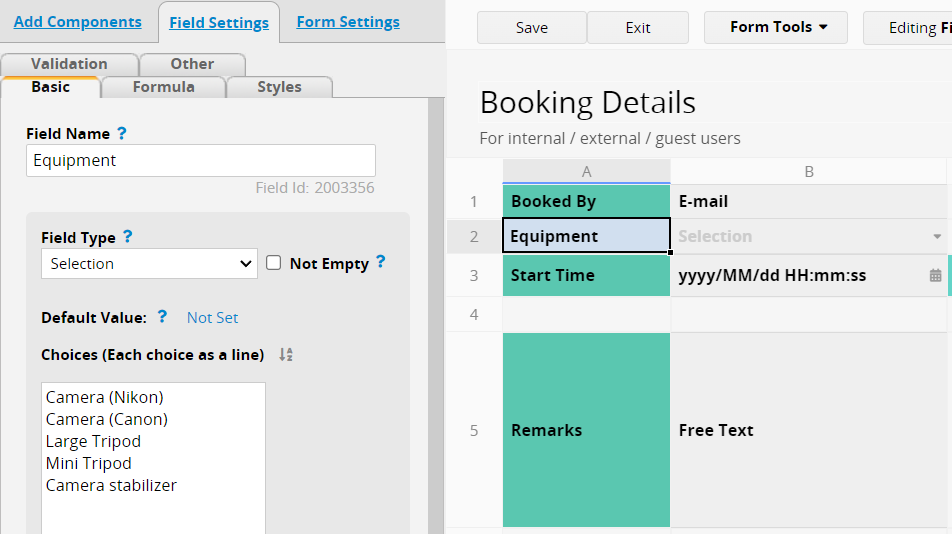
3. Now the Room/Equipment field has become a free text field. Change it to the “Selection” field type and enter the different pieces of equipment for loan as the choices.
4. After completing the previous three steps, you can delete the original Venues / Equipment list sheet, and the system is now a single sheet in its entirety. (If the previous steps were not performed, the deletion of the sheet would be blocked by the system before the field and the sheet are unlinked)
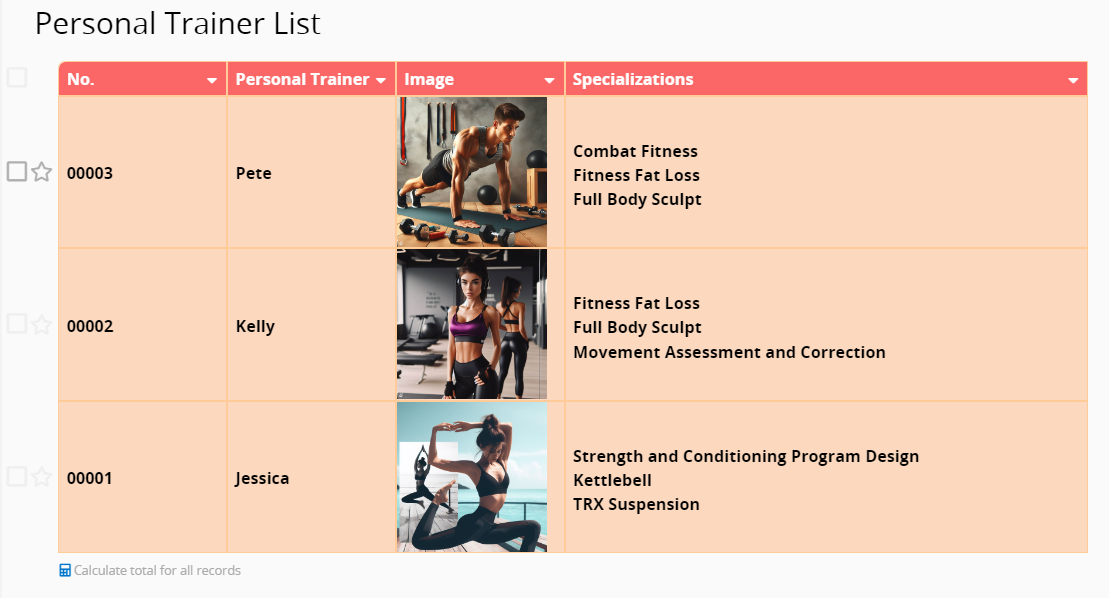
The difference between meeting room (reservation) management and a personal appointment system is again that the item being reserved has changed from a meeting room or venue to a person offering the service. So that’s all you have to modify to change the existing template into a personal appointment system.
For example, you can change the Venues sheet to become a “Staff (coach, nail artist, etc.) list” and adjust the relevant fields and sheet names, like this:
Then, go to “Booking Details” and rename the “Room” field to something appropriate for your application.
If there is only one person to choose from, e.g. I am personally offering consultation time slots for appointments, then this list would only have one entry and it would be overkill to use an entire sheet for this purpose. In this case, the “Simplify sheet” step mentioned earlier is exactly what you need. Just change the choices available for appointment to list only you. (Note that even though only one person is available to be selected, this field needs to be kept for the reservation report to work properly. )
If you feel that the default colors of the template don’t give the right vibe, you can choose a different theme for the sheet or start customizing the color scheme from scratch.
If the access rights need to be modified, you can do that while referring to this tutorial.
For more advanced function design (sending automatic notification e-mail, calendar integration, reservation tracking, and statistics), please refer to this tutorial.

